Showing posts with label recipes. Show all posts

22 September 2014

Stocking up for Fall

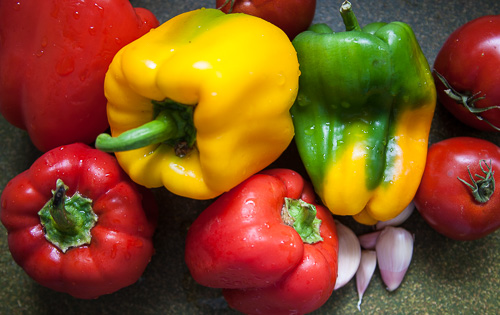
Prep for Shakshuka

Classes start tomorrow, and today I'm trying to get my house in order, preparing to be submerged in the school kitchens for another eleven weeks. One of the resolutions I made, coming out of my week at the farm, is to waste less food at home. I've slumped into some bad habits; buying groceries with good intentions and then finding sad bags of moldy veg lurking in the crisper weeks later; being lazy about separating food parings for composting; going out to eat when I'm "too tired to cook." I won't promise to be perfect, just to be more mindful, and today I made a good small start.

I sifted through everything in my fridge, and did some cooking for meals later this week. Lucky for my pride, this time the dive into the fridge turned up only one item that had to be composted (a half jar of very expensive fermented carrots, that had molded) and everything else got either cooked or otherwise prepped for use. Here's my list of accomplishments for the day:

Cooked up a big pan of shakshuka sauce
Refreshed my sourdough starter
Cut up a bunch of fresh veg for snacking
Stewed all the veg trimmings to make a quart of vegetable stock

I will freeze some of the pepper sauce and the stock. There are dozens of recipes for shakshuka, but they all result in a strongly seasoned tomato-based sauce, in which you poach eggs before serving it topped with a bit of yogurt and accompanied by good bread. Mine is based on Yotam Ottolenghi's recipe in the cookbook "Jerusalem," though you can see another version of his recipe here. It's a very flexible thing to make.

Shakshuka sauce

Dice 4 or 5 good-sized sweet or bell peppers
Chop 4 cloves of garlic
Heat a tablespoon or two of olive oil in a heavy, deep pan
Add the peppers and garlic along with:
a teaspoon of cumin and of salt
2 teaspoons of tomato paste
a teaspoon of Sriracha or hot sauce of choice

cook this all for about 10 minutes to soften the peppers
add about 5 cups of chopped tomatoes (fresh or tinned, or a mix)

cook until the sauce becomes fairly thick (about 20 minutes)

24 August 2014

Baker's Percentage... with Biscuits

Professional baking has a language all its own. For example, a "formula" is a list of ingredients and quantities, which may or may not include instructions for how to make the bakery product. A formula that does include instructions can be called a recipe, but only if you want to sound like an amateur; in fact even needing instructions for common products (like creme anglaise or pate sucree) marks you as an amateur or, at best, a beginner. I'm only slightly exaggerating; by the time I finish third quarter at Seattle Culinary, I will be expected to have many common baking formulas memorized, and be able to produce them without referring to books or notes.

One aspect of professional baking formulas that has appealed to my engineer's mind is "baker's percentage" (sometimes called baker's math). The idea behind baker's percentage is that since most baked goods contain flour, you can express the quantity of other ingredients in a formula as a ratio (percentage) of the amount of flour. For example, if a recipe calls for a pound (16 ounces) of flour and 8 ounces of water, the percent of water is 8 divided by 16, which is 0.5 or 50%. Flour will always show as 100% in formulas using baker's percentage.

Cheese Biscuits

Photo of lovely cheese biscuits to take your mind off my possibly confusing explanation.

I can see some big advantages in using baker's percentage in a formula. The main advantage is that it allows easy and flexible scaling of the outcome of a formula. For example, a bread formula can be easily sized up or down to create the desired weight of dough for however many loaves the baker needs to make. Another advantage is that it encourages bakers to measure ingredients by weight, which will produce much more accurate and reproducible results (since for most ingredients like, say, flour, one person's cup measurement can contain a different amount of flour than another person's, due to handling of the flour, dry ingredients being packed down, and so on). A third advantage is that it provides a common language for writing formulas, independent of any particular weighing scheme (metric, imperial, whatever).

I'll use the cheese biscuits as an example. The original recipe (click here to view) called for:

8 ounces all-purpose flour
0.4 ounce baking powder
0.2 ounce salt
4 ounces cheese
8 ounces cream
total weight: 20.575
makes about 10 two-ounce biscuits

To convert to baker's percentage:

flour (8 ounces gives us a divisor of 8 for this formula) 100%
baking powder (.4 / 8) = 0.05 = 5%
salt (.2 / 8) = 0.025 = 2.5%
cheese (4 / 8) = 0.5 = 50%
cream (8 / 8) = 1.00 = 100%

Let's say you want to make 40 biscuits. You see it requires 8 ounces flour in the original recipe to make 10 biscuits, so you would need 32 ounces (4 times 8) to make 40. Then you can use the baker's percentages to calculate the other ingredients:

flour 32 ounces
baking powder (32 * 5%) = 1.6 ounces
salt (32 * 2.5%) = 0.8 ounce
cheese (32 * 50%) = 16 ounces
cream (32 * 100%) = 32 ounces

Easy as pie... or biscuits.

20 August 2014

Gâteau Breton aux Pommes sur le Grand Buffet

On the last cooking day of summer quarter, the school hosts a Grand Buffet in the Atrium at Seattle Central. It's the same format as the daily small-plate service we've been running all summer, where plates are set out on long white-cloth'd tables, and patrons buy tickets (50 cents each) which they trade for whatever catches their fancy. The Grand Buffet is on a larger scale, however, and for this one day, each student is allowed to make one item of her choice (within reason, and using stock on hand). I chose to make Gâteau Breton aux Pommes using a Bon Appétit recipe. I baked this according to the recipe, except I also made the crème fraîche from scratch (much easier than it might sound: it's just whipping cream spiked with a little buttermilk and left out overnight to get slightly sour).

Gateau Breton aux Pommes

Here is the cake, just cooled, on a cake stand waiting to be sliced. By the way, these cake stands are wonderfully useful especially when slicing or decorating tarts and cakes. The base is very heavy cast iron, and the top rotates. I plated the slices of cake on a small pool of salted caramel sauce, with a spoonful of whipped crème fraîche on the side. Here are the slices on the buffet table:

Cake on the Grand Buffet

Does a cake with a French name really taste better? I can't answer that for certain with this cake, as I did not get to taste it. It certainly smelled wonderful! Everything went out to the buffet and this cake disappeared quickly. I did get to taste a bit of leftover caramel sauce (deliciously brown-buttery stuff) and the crème fraîche (very rich and slightly tart, a good balance for the sweet cake and sauce).

Here's a view of the pastry tables at the buffet. This was just before the buffet started. The tables were refilled at least twice as items sold and new treats were plated. These plates were all sold for two tickets, i.e. for one dollar. No wonder the buffet is popular.

Grand Buffet Tables

The day after the Grand Buffet was the last day of school for summer, and we spent it, as usual, deep-cleaning the kitchens. Now I have a month off until Fall Quarter. I'm going to spend a week of my summer break at Qullisascut Farm in Rice, WA, at farm school. Goats! Chickens! Cheese-making! Baking in a wood-fired oven!

17 August 2014

Celebration Cakes

One of the summer rotations is "Wedding and Celebration Cakes." It was my least favorite rotation, partly because I'm not very interested in fancy cake decorating, but especially since the French chef who usually teaches cake decor (and who is an expert; he's even made a six foot tall replica of the Eiffel Tower... in chocolate) was injured and had to take the last two weeks of the summer quarter off. We pretty much winged it on our own, with a little guidance from the replacement chef. My team (four of us) spent 3 days making a huge wedding cake, only to find that all the marzipan was used up, and our chosen decoration (marzipan ribbons and bows) could not be done in fondant. The cake did turn out to be tasty (almond cake with tart cherry jam and vanilla buttercream filling), but we resorted to decorating it with fresh flowers.

Almond Cherry Wedding Cake

Not bad looking if you don't examine it too closely, and it did sell very well by the slice so at least it wasn't a waste of time and ingredients. The part I enjoyed most on this project was that I got to make the tart cherry jam for the filling.

During the last 3 days of the rotation, we were allowed to build any "celebration cake" we wanted to make. Some people made fancy cakes from the same batter as the wedding cake, generally covered and decorated with fondant (one of my partners made a Despicable Me cake) but I decided to make something I thought would be good to eat (I think fondant is tasteless and sticky). I chose to make Carrot sponge cake, cut into four layers, with mascarpone-cream cheese filling spiked with orange zest and plain cream cheese buttercream frosting on the outside. To decorate it, I made a constellation of fondant stars...

Celebration Cake Stars

... though I ended up using only a few of them, as I decided to place the stars so they'd look good when the cake was cut. Here's the finished cake:

Celebration Cake

And here it is cut into slices:

Celebration Cake Slices

The slices sold for $2, except for two that I took home for myself and a friend to sample. The cake really was delicious, though if I made it for home, I'd leave it as two layers, and use the orange-mascarpone as both filling and frosting. The cake is very moist and doesn't need a huge amount of frosting. The orange zest and mascarpone were very good variations to the usual cream cheese frosting you find for this cake; they made the filling both lighter and tastier. Here is the cake recipe (based on one from my first quarter recipe packet).

Carrot sponge

Butter and lightly flour two 8 inch cake pans; line the bottom with parchment.
Preheat oven to 350F.

4 eggs
3/4 cup mild-tasting vegetable oil
14 ounces sugar
1/2 tsp salt
9 ounces bread flour
1 Tbsp cinnamon
3/4 tsp baking soda
1/4 tsp baking powder
1 lb peeled carrots, grated finely
4 ounces chopped walnuts

Whip eggs until frothy, then gradually whip in the oil.
Mix in the sugar and salt (on low speed if using a mixer).
Sift the dry ingredients and add to the egg mixture.
Fold in the carrot and walnuts until evenly distributed.
Divide batter evenly between the cake pans and bake until done, about 40 minutes. Test doneness with a wooden toothpick or skewer; it should come out moist but not sticky. Let cool 10 minutes in the pan, then turn out on a rack to cool completely before frosting.

Mascarpone Orange Frosting (recipe via Nigel Slater)

250 g (8.8 ounces) mascarpone
200 g (7 ounces) cream cheese
150 g (5.3 ounces) powdered sugar
zest of one orange, finely grated

Beat the cheeses and sugar in a mixer until smooth and creamy, then beat in the orange zest. This will make enough to fill two layers and cover the cake.


27 July 2014

Rustic Desserts

Lots of photos for you today. My "Rustic Desserts and Ice Cream" rotation was a busy one. There were eight people in my group for this rotation, and we all had to share one table for most of the time, so there was a lot of negotiating on use of table space, and some creative redeployment to any other space that might happen to be open (like the cheese room). We made lots of product; I'll show you my favorites here.

I started by making two pies, a Macadamia Nut Cream Pie, and Lemon Raspberry Meringue pie. The meringue pie was based on this recipe from Bon Appetit, except lemon instead of lime, and raspberries instead of blackberries. The Italian meringue on top toasted up beautifully using a kitchen torch, and had a great roasted marshmallow flavor. I used tayberries for the decor since we were out of raspberries that day. This pie sold very well and was delicious, and not hard to bake. The macadamia nut pie was good, too, though it does not look nearly as glamorous.

RusticPies

This is olive oil / orange cake, served on a base of sliced apricots that were poached in syrup infused with basil. I think if I made this again, I'd strain out the basil after poaching and put in some fresh basil, so it would look prettier on the plate. But in any case, it tasted good, and the cake was very tender and moist.

RusticOrangeCake

We had a ton o' peaches that were all ripe at once, so I made a lot of peachy stuff, including this shortcake (which, by the way, was priced at $1.50)...

RusticPeachShortcake

... and a bunch (three 9 inch and a baker's dozen 5 inch) of peach pies:

RusticLotsOfPeachPies

I also made some ice cream. First a Bombe (this one is basically whipped cream combined with Italian meringue and frozen), with the cream infused with fresh lemon verbena leaves. It was decadently rich on its own, so I plated it simply with fresh tayberries.

RusticLemonVerbenaBombe

Then I made some buttermilk ice cream, using raw sugar, which turned it a delicate pale brown. One of my rotation buddies made Anzac biscuits (coconut/oatmeal cookies) and assembled those into ice cream sandwiches.

RusticButtermilkIceCreamSan

I also made a terrific "slab pie" with a base of pâte sablée (very rich, short pie crust), then a layer of almond cream, topped with quartered fresh apricots and a little raw sugar, and baked in a hot oven until the apricots were roasted. I cut it into bars 2" x 3" and it was hugely popular. It is a recipe Chef Don used to make a lot at one of his bakery gigs, and I can see why it's a best-seller. I forgot to take a photo, though!

27 June 2014

We're Jammin'

What I did on my summer vacation: made Rhubarb and Whole Strawberry Jam from Christine Ferber's "Mes Confitures".

RhubarbStrawberryJam

The farmer's market still had some young rhubarb, and strawberries are peak season in Washington now, so I decided to make some more jam. This is the second recipe I've made from Ferber's book; the first was plain rhubarb jam (blogged here). Ferber's jams are very sweet (to my taste). She prescribes a ratio of 80% sugar (to fruit, by weight). I decided to modify this batch of jam to 60% sugar. I also cut the recipe approximately in half, which resulted in four half pints, plus about 2/3 cup extra.

600 gm prepared rhubarb (trimmed, stalks cut lengthwise, diced)
360 gm sugar
600 gm strawberries (washed and hulled, left whole)
360 gm sugar
juice of one lemon

The directions for cooking the jam are a bit complicated at first reading. Basically you are making each fruit into jam separately, and combining them at the end just before canning. The whole process takes three days. I had to write out a schedule to keep track of all the steps. I found several internet sources discussing the recipe and telling about modifications, which was a big help, and based on their suggestions, I cut back on the most complicated step, which calls for bring the strawberry mixture to a boil 5 times, repeating the sequence four times at 8-hour intervals. EH? The idea is to concentrate the syrup and infuse the whole berries with syrup without mashing them. I cut the interval time down so that I could get this done in one day. I also changed the final boiling step so that I cooked the two fruits together, rather than cooking separately, combining, and cooking again. My process was:

Day 1:

Mix strawberries, sugar, and half the lemon juice in a non-reactive bowl, cover and refrigerate overnight.

Day 2:

Strain the berry syrup, bring to a boil and boil for 5 minutes, pour the syrup over the berries, skim, cover, refrigerate.

Mix the rhubarb, sugar and the rest of the lemon juice in a non-reactive bowl, cover and refrigerate overnight.

Day 3:

In the morning, put the strawberry mixture into a pan and bring it to a boil 5 times (bring to boil, take off heat until boiling stops, return to heat and bring to boil, and so on). Wait 2 hours and repeat. Do the 5 times boiling four times in total.

Get your canning jars and lids sterilized: lids in a pan of simmering water, clean jars in the oven at 225F.

Then take the rhubarb mixture out of the fridge. Strain the juice of both mixtures into a pan. Bring to a boil, skim and continue to cook at a boil until the syrup reaches 221F (105C). Add the fruit; continue to boil, skimming any foam, for 5 minutes.

Fill the jars to the top, wipe the rims if needed. Put on lids and screw down the caps, then turn the jars over to cool. Alternatively, you can water-bath process them (see here for instructions). The "turn jars over" method is the traditional French method.

A note on sugar: in the rhubarb jam I made earlier, I used unbleached sugar, and the resulting jam turned out a bit on the brownish side of red. For this jam I used white sugar, and the color is much better. The jam is very tasty, tart and sweet. I think if I make this again, I'll use a higher proportion of strawberries to rhubarb, perhaps 60/40.

05 May 2014

The Lonely Pint

Sounds like a good name for a pub, doesn't it? So, this morning I got everything prepared for cooking the jam. You can (maybe) see in the photo below that the mixture produced lots of juice overnight. I assembled all the tools I thought I'd need for making and canning the jam: plenty of jars, jar-lifter, candy thermometer, strainer and spoon, skimmer and jar funnel (cooking pot not shown). It looked like about a quart of raw fruit, so I got out two pint jars and four half-pint ones.

rhubarbJam4

First step is to make sure the jars and lids are sterile and hot. Jam doesn't require hot-bath canning, so I put the jars in the oven instead of in boiling water (225F). I put the lids in a small pan of simmering water. The jar rings don't need to be sterilized.

The process of cooking the jam is pretty simple: strain the juice, bring it to a boil, skim, and boil until the thermometer reads 221F / 105C. (Note to self: get a different candy thermometer - every time I use this one, I remember how hard it is to read.) When the syrup has cooked down enough, add the rhubarb, bring back to a boil, skim and cook, stirring, for 5 minutes. Ladle the jam into hot jars (this is where the jar funnel comes in handy) and put hot lids on top, then tighten down the rings to seal.

You notice I said "jars".... but this amount of rhubarb yielded exactly one pint, so I only needed one jar. I should have used two half-pint jars, but by the time I realized this, it was too late. On the other hand, the jam makes up in flavor for what it lacks in size. Wonderfully rhubarby with just a slight bite of lemon. Beautiful deep ruby color, too.

rhubarbJam5

04 May 2014

Mise en place for Rhubarb Jam

Tis the season for rhubarb, and I have a friend with a healthy plant, so am making rhubarb jam. This also gives me a chance to practice my execrable (according to the French chef at school (note: must also be said with a French accent)) knife skills. I am following a recipe from a book recommended by Chef James, Christine Ferber's "Mes Confitures". There are some delicious-sounding and unusual recipes in the book ("Plum and Apple with Anise and Vanilla" for example) and the book is arranged by seasons, to feature the freshest and ripest fruit.

She has ten recipes featuring rhubarb, and I'm starting with the simplest one: rhubarb, sugar and fresh lemon juice. The recipe calls for 1 kg net (prepared) rhubarb, 800 gm sugar (so 80% of the weight of the fruit) and juice of one lemon. My first step was to wash, trim, dice and weigh the rhubarb. My yield was 465 grams.

rhubarbJam1

The next step was to calculate how much sugar I'd need, and to weigh the sugar. 80% of 465 is 372 grams. I'm making a little less than half the original recipe, so I squeezed half a lemon. Here is my mise en place:

rhubarbJam2

Finally, I mixed this all together, covered it and put it in the fridge. It needs to macerate overnight to draw out the rhubarb juices and let the lemon start to activate the gelling power of the pectin. Tomorrow I will cook and can it.

rhubarbJam3