At SCA, the third quarter of the Pastry program has one practical test that accounts for around 50% of one's Practicum (the hands-on portion of our classes) grade. Before the test, we're given a list of 9-10 products (for example, brioche or lemon curd). We have to memorize the ingredients (not the exact amounts, but the general proportions and of course the actual ingredients) and also the method of making the product.
For the test, we all go into the kitchen early in the morning. There are tables set up with a group of ingredients (not labelled - you have to recognize the item) on each table, and a number. We each draw a number out of a hat, go the the table with that number, and have an hour to recognize the product and make it (using the correct method). Sanitation counts, as does accuracy in following the method, and of course, the end result must also be acceptable.
No pressure, right...?
For my test last quarter, there were nine of us students, and we had nine possible products:
Brioche
Lemon Curd
Bavarian Mousse
Hot Method sponge cake
Two Stage Method sponge cake
Creme Anglaise
Merinque Buttercream
Biscuit Joconde
Dacquoise
I used two methods to study for this test: flash cards, and a flowchart. On my flashcards, I drew the ingredients on one side (as they might appear when seen on the table) and on the other side I put the name of the product and its method.
I was worried about being able to identify some of the products, because many of them had ingredients in common (different kinds of flour, for example). So, engineer that I am, I did some analysis of the ingredients, and realized it was really not that complicated to figure out what the product was. Below you can see my flowchart (and also sample flash cards). Click to enlarge.
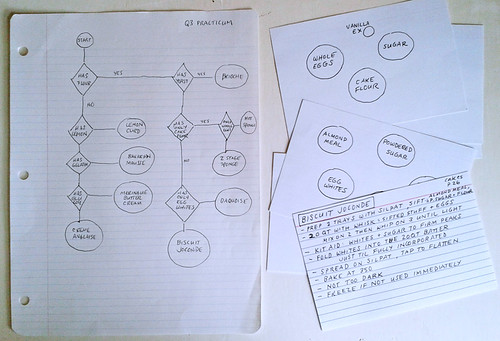
I'm not going to bore you with the whole flowchart explanation, but it involved breaking down the decision-making to simple questions based on observation: only one product has lemon; only one has yeast; and so on. My fellow students (and the chef instructor) thought this was fairly nutty, but when I explained the logic behind it, they still thought it was nuts, but in a clever way.
So, how did the test go? We all got ourselves way too worked up and nervous over it, and none of us got 100%. One person did not pass. I had no trouble with product recognition (I got Brioche) but I had not made brioche for three months and was thrown off by the quantity (one fourth of the amount we usually mix) and though it turned out ok, I was obviously nervous (for which I lost points) and added the butter too soon (for which ditto). OH WELL, lesson learned (studying's good but staying calm is better).
baking for engineers
11 May 2015
09 May 2015
Catching up
Well! Time to catch up on third quarter, especially since I'm now 4 weeks into my last quarter. I showed you some cakes and plated desserts in my last post; they were followed by doughs:
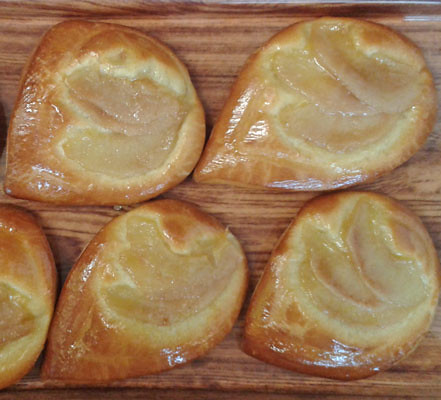
(That is fresh pear brioche), by breads:
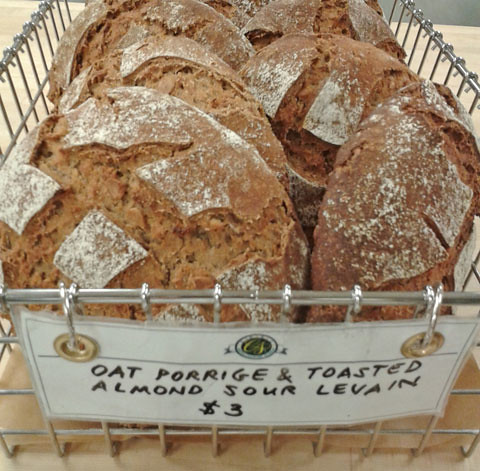
(Sourdough, with oat porridge and almonds folded in), and tarts:
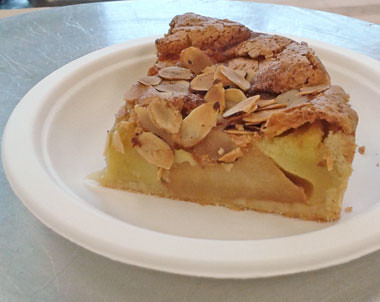
(Tarte Normande, big chunks of apple, and topped with sliced almond).
I made quite a few variations on what we call "three day breads." The technique for these is tuned to the rather unusual (for a bakery) hours we have to work on them. We're in the bakeshop from 9:00 a.m. until 1:30 p.m. each day, so we have to adjust rising and proofing times to suit, while still letting these breads develop the best flavors. The typical schedule is like this:
Day one:
Mix the preferment (sourdough-based starter) around noon, cover and leave out at room temperature overnight.
Day two:
Mix the preferment with the rest of the final dough ingredients except the salt (I do this by hand if I'm making the more-or-less standard 8 to 9 two-pound loaves). Cover the bowl and let it sit 30 minutes. This step is called "autolyse" and it lets the flour start to hydrate itself, and the enzymes in the flour a chance to start breaking down starches and proteins.
Then mix in the salt and put the dough in an oiled bin.
For the next 3 hours, fold the dough every 30 minutes. "Folding" means lifting the dough on one side and folding it over the main dough, then lifting the opposite side and folding over, then ditto for the two other sides. The folding serves the purpose of kneading and punching that you probably have seen in ordinary household bread recipes. It's wonderful to see how the dough develops between each fold, getting more lively, smoother, and developing that lovely sourdough smell.
After completing the folds, scale (cut the dough and weigh it in equal amounts - for us it's usually two pounds) and preshape the loaves. Often the preshape is a "loose boule" (soft round ball) but not always - the preshape depends on what you want your final shape to be. Let the preshaped loaves rest on a floured surface (bread board) for 15 minutes.
Do the final shaping of choice for the loaves, and put them in floured banettons (plastic bowls) or cloth-lined baskets. Retard (chill) overnight. We have a proof box that can have its temperature adjusted for either a warm or cool rise. A home baker equivalent would be to put the loaf in the fridge overnight. It will continue to develop but at a very slow pace.
Day three:
Take loaves out of the retarder and let them warm to room temperature - about an hour and a half. The loaves will revive and start to raise. When they are ready, turn the out of the baskets or banettons, slash them (this lets the crust open nicely when baking), and bake.
For you home-bakers, here is an excellent video showing how to use this same method for home bakers. It's from an Irish bakeshop and bread school called Riot Rye, whose mission is to empower people to make home-baked bread.
OK, that's the end of today's lesson! Next post I will explain the relevance of flowcharts to Pastry. Really!
Labels:
techniques,
third quarter
07 February 2015
Let's All Eat Cake
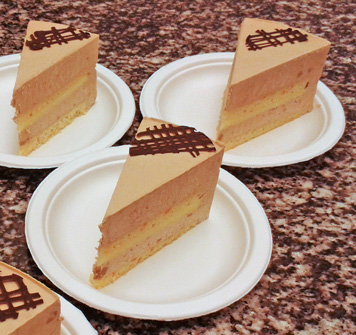
I've been having a lovely two weeks working in the Chocolate Room (a relative oasis of quiet in the chaos of the bake shop) making European-style cakes for my cake rotation. I am under the guidance of the French Chef and have learned a lot, including The Right Way (i.e. the French Chef's way) to make chocolate mousse, lemon cream, and Bavarian cream, and how to caramelize the top of a mille-feuilles. I made two kinds of cake each week.
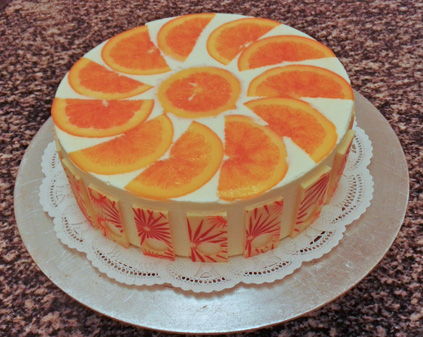
This one was perhaps my favorite, mostly because I made it up based on other recipes in our packet. Its flavors are citrus (lemon mousse, chocolate-lemon flourless cake, candied orange slice decor) and berry (a layer of raspberry & strawberry coulis). The wafers on the sides are some white chocolate decor we made earlier in the week in chocolate class. It was supposed to have lemon slices as decor but I forgot to candy them the day before assembling the cake.
This cake was also interesting because to put those orange slices on the top of the cake, I built it upside down: I wrapped the cake ring in plastic, and the slices went in first, followed by mousse, a cake layer, mousse, the berry coulis, more mousse, then the last cake layer. After freezing, it is turned right side up before removing the ring.
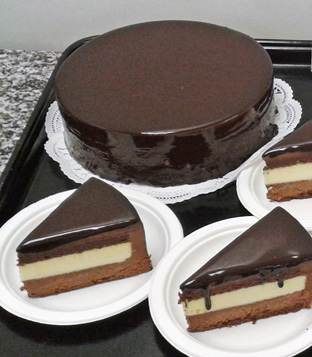
This cake is called "Riviera." It has dark chocolate cake, lemon cream, and dark chocolate mousse, and is finished with a shiny chocolate glaze.
Next is "Le Brazil" with orange cake, an orange creamy layer, filled with coffee bavarian cream. Very delicious flavor combination.
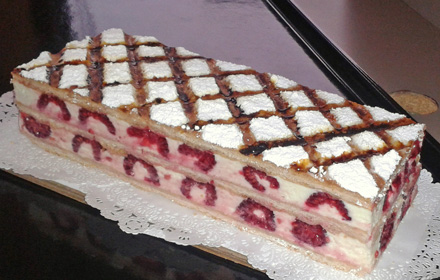
And finally, raspberry mille-feuilles. Mille-feuilles means "thousand layers." You may be familiar with this cake as a Napoleon pastry. The "cake" part is puff pastry that is rolled very very thin on the sheeter, then twice-baked to make it very crispy and light. Three layers of puff alternate with layers of fresh raspberries nested in buttery vanilla mouselline. The top is dusted with powdered sugar, and the caramel marks are made by heating a thin metal rod over the gas flame and then scorching the sugar to caramelize it.
My next two weeks are Tarts: one week of sweet (two kinds) and one of savory.
Labels:
third quarter
02 February 2015
New Year, New Quarter
Fresh new year, and a fresh new quarter. I am optimistic about this quarter for two reasons: first, we no longer work in teams on our bake shop rotations, so we each are responsible for planning and completing our own baking; and second, the French chef is back (he was out on the injured list last quarter). He is very strict, very knowledgeable, and enormously patient in teaching and demonstrating (as long as he knows you are paying attention and trying to get it right... otherwise, look out!). I can already tell that the bake shop is less chaotic and also is cleaner than last quarter, even though we have more students that ever (16 in second quarter and 17 in first quarter). No fires yet! There were two last quarter, so you can perhaps see why it's an improvement having him back.
Eight of my original nine fellow third quarter students have returned, and we are joined by two other women who were once a quarter ahead of us, but who decided to take a quarter off. So there are ten of us, still all women. The Gang of Ten! I have some good academic classes this quarter: sustainability, nutrition "for culinary professionals" and a baking theory class that's all about chocolate. We again have five, two-week long rotations. My schedule (order of rotation) is:
Plated desserts
Cakes
Tarts
Bread
Doughs
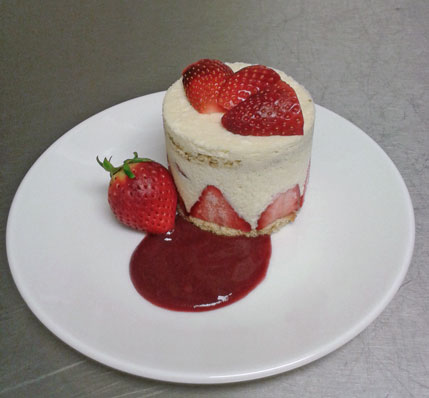
I've completed the plated dessert rotation and am happy to say it went well. For third quarter, we make two desserts each week, and if they are good enough ("good" means both tasty and beautiful) then they are served in the One World restaurant (the higher-end restaurant of the two the school runs). Here are two of the desserts I made, so you can get an idea of their nature. This is a mini version of a classic French cake called Le Fraisier (The Strawberry). The little cake includes pistachio sponge cake, fresh strawberries and vanilla mousse. I finished it with fresh strawberries and a strawberry-balsamic semi-pris (a lightly jelled sauce).
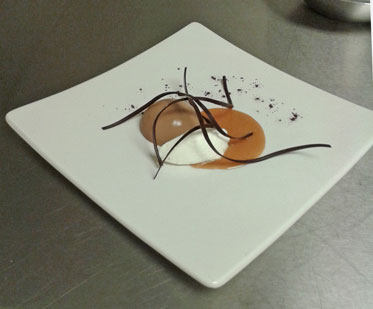
This next one isn't as pretty but was very tasty. It's mocha panna cotta, with whipped cream made a bit tart with creme fraiche, and a caramel rum sauce. Dark chocolate curls for decor, plus a little cocoa powder to make it fancy-schmancy.
My other two desserts were a sort of deconstructed Black Forest cake, and a cassis cake with frozen vanilla cream, coated in thin caramel. Neither of those photographed well (I blame the photographer) so you'll have to use your imagination.
Last week and this week I'm making European-style cakes (lots of thin layers of cake, mousse, cream and/or jam or jelly). Also we made four kinds of chocolate ganache in theory class, and will be making chocolates this week. Fun!
Labels:
schedule,
third quarter
Stick a fork in it
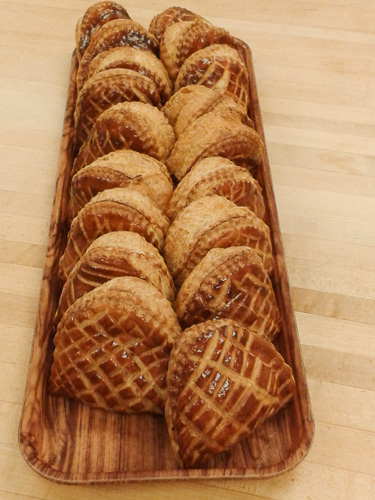
Second quarter has been over for months. I'm a few weeks into third quarter, but even with a month off in December, I haven't been able to write about the last weeks of second quarter. I've intended to keep this blog both truthful and positive, but the truth is second quarter's practicum was at times tedious and stressful and plain unpleasant. So let me just stick a fork in it, and call it done. To end on a brighter note, I'll show you one of the beautiful and pleasing things I learned to make: classic puff pastry. Look! Chaussons!
Labels:
second quarter
17 November 2014
Falling in
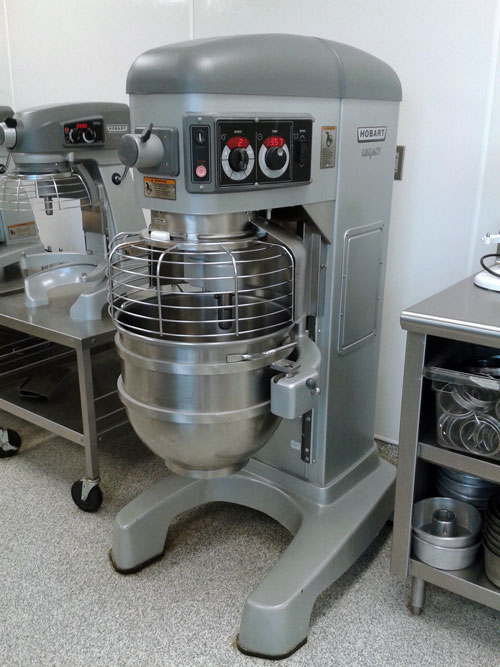
It's definitely fall here in Seattle, and I've fallen through seven weeks of the quarter without a single blog entry. I blame this beast:
In a fit of wild optimism, I decided it would be fun to take a work-study job, doing the mixing of muffins and scones for the early shift at the Pastry Case. I did NO due diligence about hours and responsibilities, and oh have I paid for my ignorance. The job included more hours than I'd expected - 6 or 7 hours on Mondays mixing a week's worth of muffins and scones, plus an hour and a half Tuesday through Friday, baking from 6:30 am to 8.
But besides the hours, the work had more heavy lifting than it turns out this old baker can handle. The mixer above has a 60 quart stainless steel bowl that weighs about 30 pounds. Add 35 pounds of muffin batter to that and it's not an easy lift. 70 scones packed onto a full-size sheet tray is not light either. I was exhausted by the end of the day and started getting repetitive motion aches and pains and finally decided I had to quit. It took a week or two to find and train a replacement, but I am now happily free again. My replacement is a cheerful first-quarter student who loves the job (she is also about 1/3 my age and a head taller...).
So, enough about work! Second quarter is challenging in other ways. We have classes from Tuesday to Friday, with five rotations of two weeks duration. We also have a Baking 102 (baking theory) class from 8-9 each morning, and a Food Costing and Purchasing class twice a week from 2-3. From 9 to 1:30 each day we are working & learning in the Pastry kitchens.
There are nine of us in my quarter, still all women. So with five rotations, there is always someone who is alone (i.e. no partner). These are my rotations:
1. Culinary
2. Cakes
3. Viennoiserie (also known as Doughs)
4. Individual Desserts
5. Bread
For the Culinary rotation, we work in the culinary kitchens (they have four kitchens, to Pastry's two), and have different stations each day. Their kitchens are madhouses of activity, and I did not take any photos. The stations that I can remember were Fish (how to filet a trout), Sauces (making a basic red and a white sauce), Butchery (pork tenderloin), Starch (we got to choose a starch, and I chose potato gnocchi, which turned out beautifully), Breakfast (poached egg, hollandaise, pancakes, omelet), and Salad Dressing. I enjoyed the stations, and two of the chefs were very patient and attentive so I felt I learned quite a bit; also it was educational to see how the Culinary kitchens are run, but I felt it was a very brief overview... and it's our last time of working in Culinary. I did get a lot more practice on my knife skills, in any case.
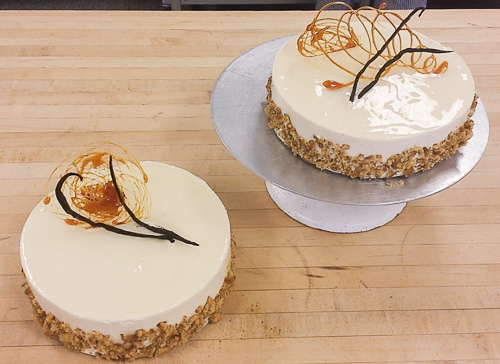
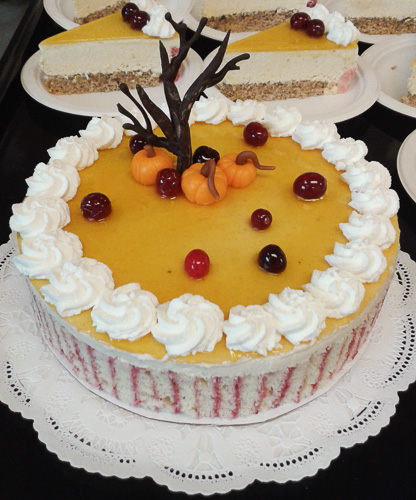
So, Cakes! In first quarter, the cake rotation makes 'American style' cakes, like carrot cake and basic sponge cakes. In second quarter, we make European style cakes, with thin layers of rather dry sponge (that gets soaked in flavored simple syrup) sandwiched between layers of mousse and/or buttercream and/or jam/jelly. We also do more decor work with chocolate, caramel and marzipan. Here are some of the cakes we made:
Eggnog Gateaux: pumpkin cake with rum simple syrup and eggnog bavarian mousse. Caramel decor - those black sticklike things are whole vanilla beans.
Curcurbita: pecan sponge cake, pumpkin cheese cake mousse, and swiss roll sponge with cranberry jam. Chocolate trees and marzipan pumpkins for decor. You can tell we made this one during Halloween week.
We also made opera cake (coffee buttercream and chocolate glacage), a caramel apple cake, and a spiced chocolate cake with passion fruit / apricot glaze and vanilla buttercream. All very rich, sweet cakes, that were fun to make but that I don't much care for to eat, or at least not more than a bite or two. Rich! Sweeeet!
I'll write about Viennoiserie in my next post.
Labels:
classes,
second quarter
22 September 2014
Stocking up for Fall
Classes start tomorrow, and today I'm trying to get my house in order, preparing to be submerged in the school kitchens for another eleven weeks. One of the resolutions I made, coming out of my week at the farm, is to waste less food at home. I've slumped into some bad habits; buying groceries with good intentions and then finding sad bags of moldy veg lurking in the crisper weeks later; being lazy about separating food parings for composting; going out to eat when I'm "too tired to cook." I won't promise to be perfect, just to be more mindful, and today I made a good small start.
I sifted through everything in my fridge, and did some cooking for meals later this week. Lucky for my pride, this time the dive into the fridge turned up only one item that had to be composted (a half jar of very expensive fermented carrots, that had molded) and everything else got either cooked or otherwise prepped for use. Here's my list of accomplishments for the day:
Cooked up a big pan of shakshuka sauce
Refreshed my sourdough starter
Cut up a bunch of fresh veg for snacking
Stewed all the veg trimmings to make a quart of vegetable stock
I will freeze some of the pepper sauce and the stock. There are dozens of recipes for shakshuka, but they all result in a strongly seasoned tomato-based sauce, in which you poach eggs before serving it topped with a bit of yogurt and accompanied by good bread. Mine is based on Yotam Ottolenghi's recipe in the cookbook "Jerusalem," though you can see another version of his recipe here. It's a very flexible thing to make.
Shakshuka sauce
Dice 4 or 5 good-sized sweet or bell peppers
Chop 4 cloves of garlic
Heat a tablespoon or two of olive oil in a heavy, deep pan
Add the peppers and garlic along with:
a teaspoon of cumin and of salt
2 teaspoons of tomato paste
a teaspoon of Sriracha or hot sauce of choice
cook this all for about 10 minutes to soften the peppers
add about 5 cups of chopped tomatoes (fresh or tinned, or a mix)
cook until the sauce becomes fairly thick (about 20 minutes)
Labels:
cooking at home,
recipes
Subscribe to:
Posts (Atom)